Taming Steam Heat with the Shelly TRV
Anyone who has lived in New York City is likely familiar with steam heat. Many buildings in the city are fitted with steam heat, and in Manhattan, ConEd even provides district steam to some buildings. Heat in these buildings is generally controlled by a central thermostat which often results in overheating. Many New Yorkers resort to simply opening their windows to control the heat. This was a practice that became common during the 1918 flu pandemic. However, there’s a less wasteful alternative to controlling steam heat. Thermostatic radiator valves have been common in Europe for years but are far less common in the United States. Combined with the Shelly TRV and Home Assistant, I’m able to reliably control the heat of my apartment throughout the winter.

Thermostatic radiator valves allow one to control the output of a single radiator. They can be fitted to many types of heating systems — one pipe steam, two pipe steam, and hot water. One pipe steam is most common in New York. This system uses one pipe — hence the name — to both deliver steam to the radiator and return condensate (water) from the radiator to the boiler. One pipe steam has a single shut off valve on one side of the radiator, and an air vent on the other. Unfamiliar with the way these systems work, city dwellers try to control their heat by partially closing this shut off valve. However, this only creates problems — preventing condensate from returning to the system — and does not achieve the desired effect. This is where thermostatic radiator valves come in.
One pipe systems require that air somehow be vented from the radiators. These vents often make a hissing sound (though that’s often an indication of a larger system issue!) There’s even a song about the sound these vents make. Without a thermostatic radiator valve, the vent attached to the radiator lets out air until steam hits the vent, and then closes. The vent stays closed until the temperature drops, and then opens again. This will happen over and over throughout the heating cycle, so long as steam is being provided to the radiator. The thermostatic radiator valve takes advantage of this process in order to prevent the radiator from heating up when heat is not desired.
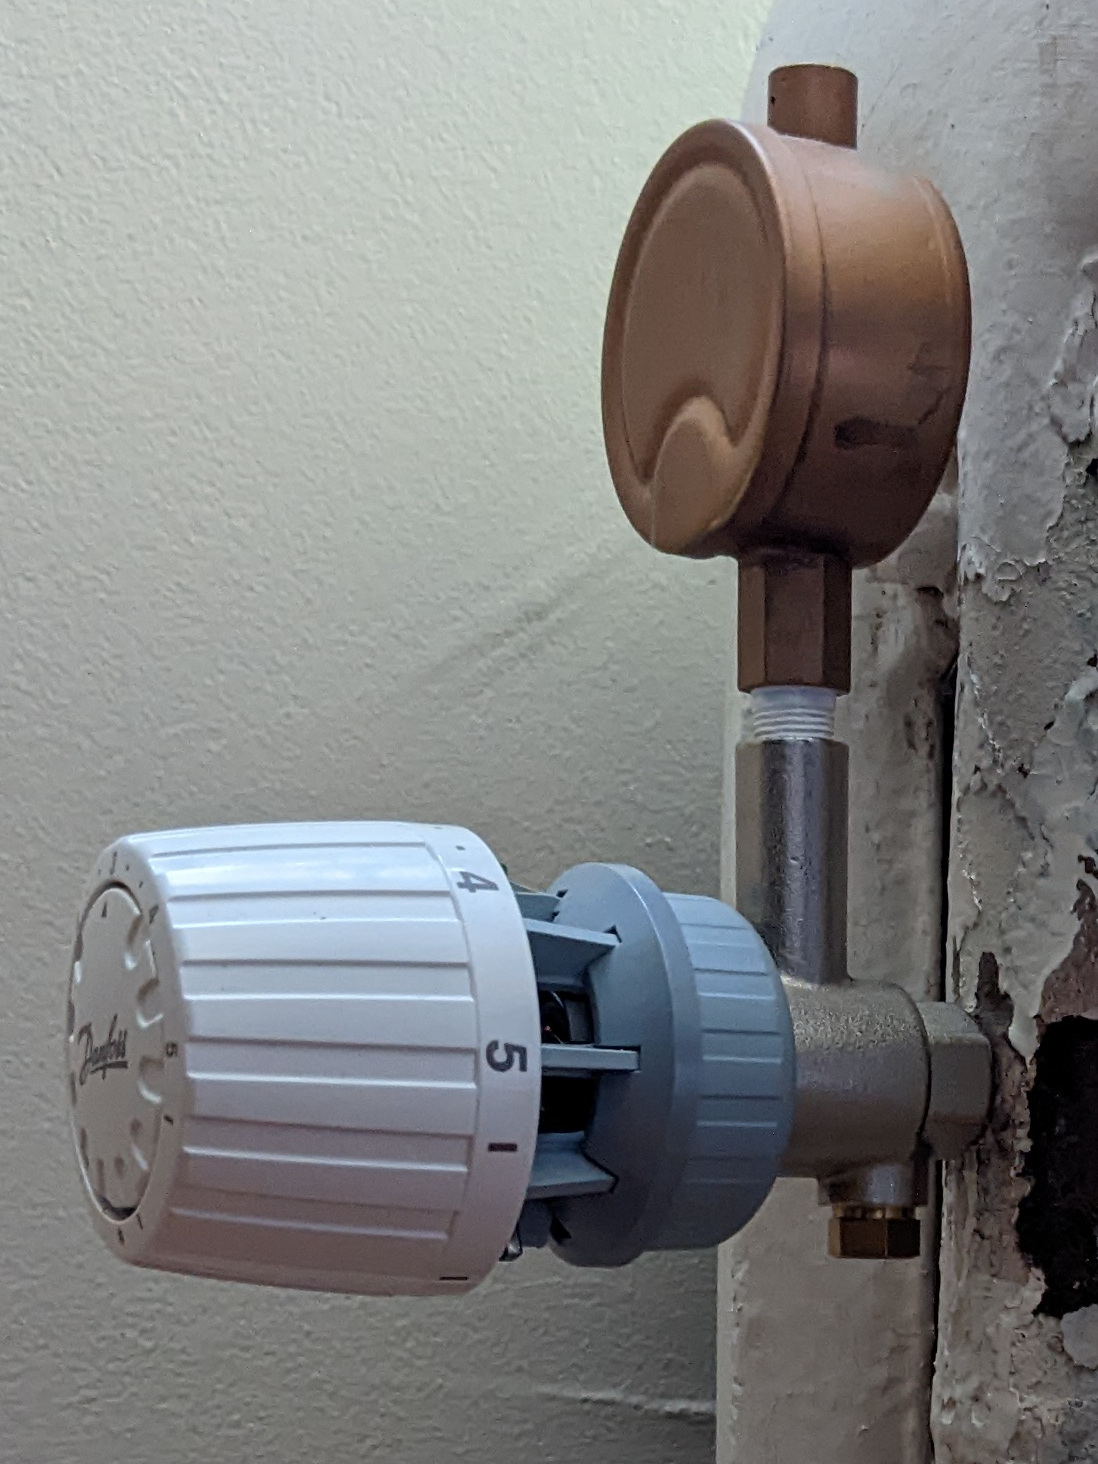
A popular thermostatic radiator valve for one pipe systems is the Danofoss RA2000 valve. The RA2000 is fitted to the radiator in place of the existing air vent. The valve is controlled by an operator — Danfoss themselves offers many different types. When I started out trying to fix my overheating problems, I purchased a simple operator that attached directly to the RA2000. This worked great, most of the time. However, because of the close proximity to the radiator, it cannot take an accurate temperature reading. Danfoss offers a remote sensor option as well, which I use in my bedroom. However, the Shelly TRV allows precise control over the RA2000 given a remote temperature reading.
Note that while I’ve discussed one pipe steam so far, there are thermostatic valve options for two pipe as well as hot water. Installation of a TRV on those systems is less of a DIY job so that’s not covered here, but any reputable plumber should be able to perform the install.
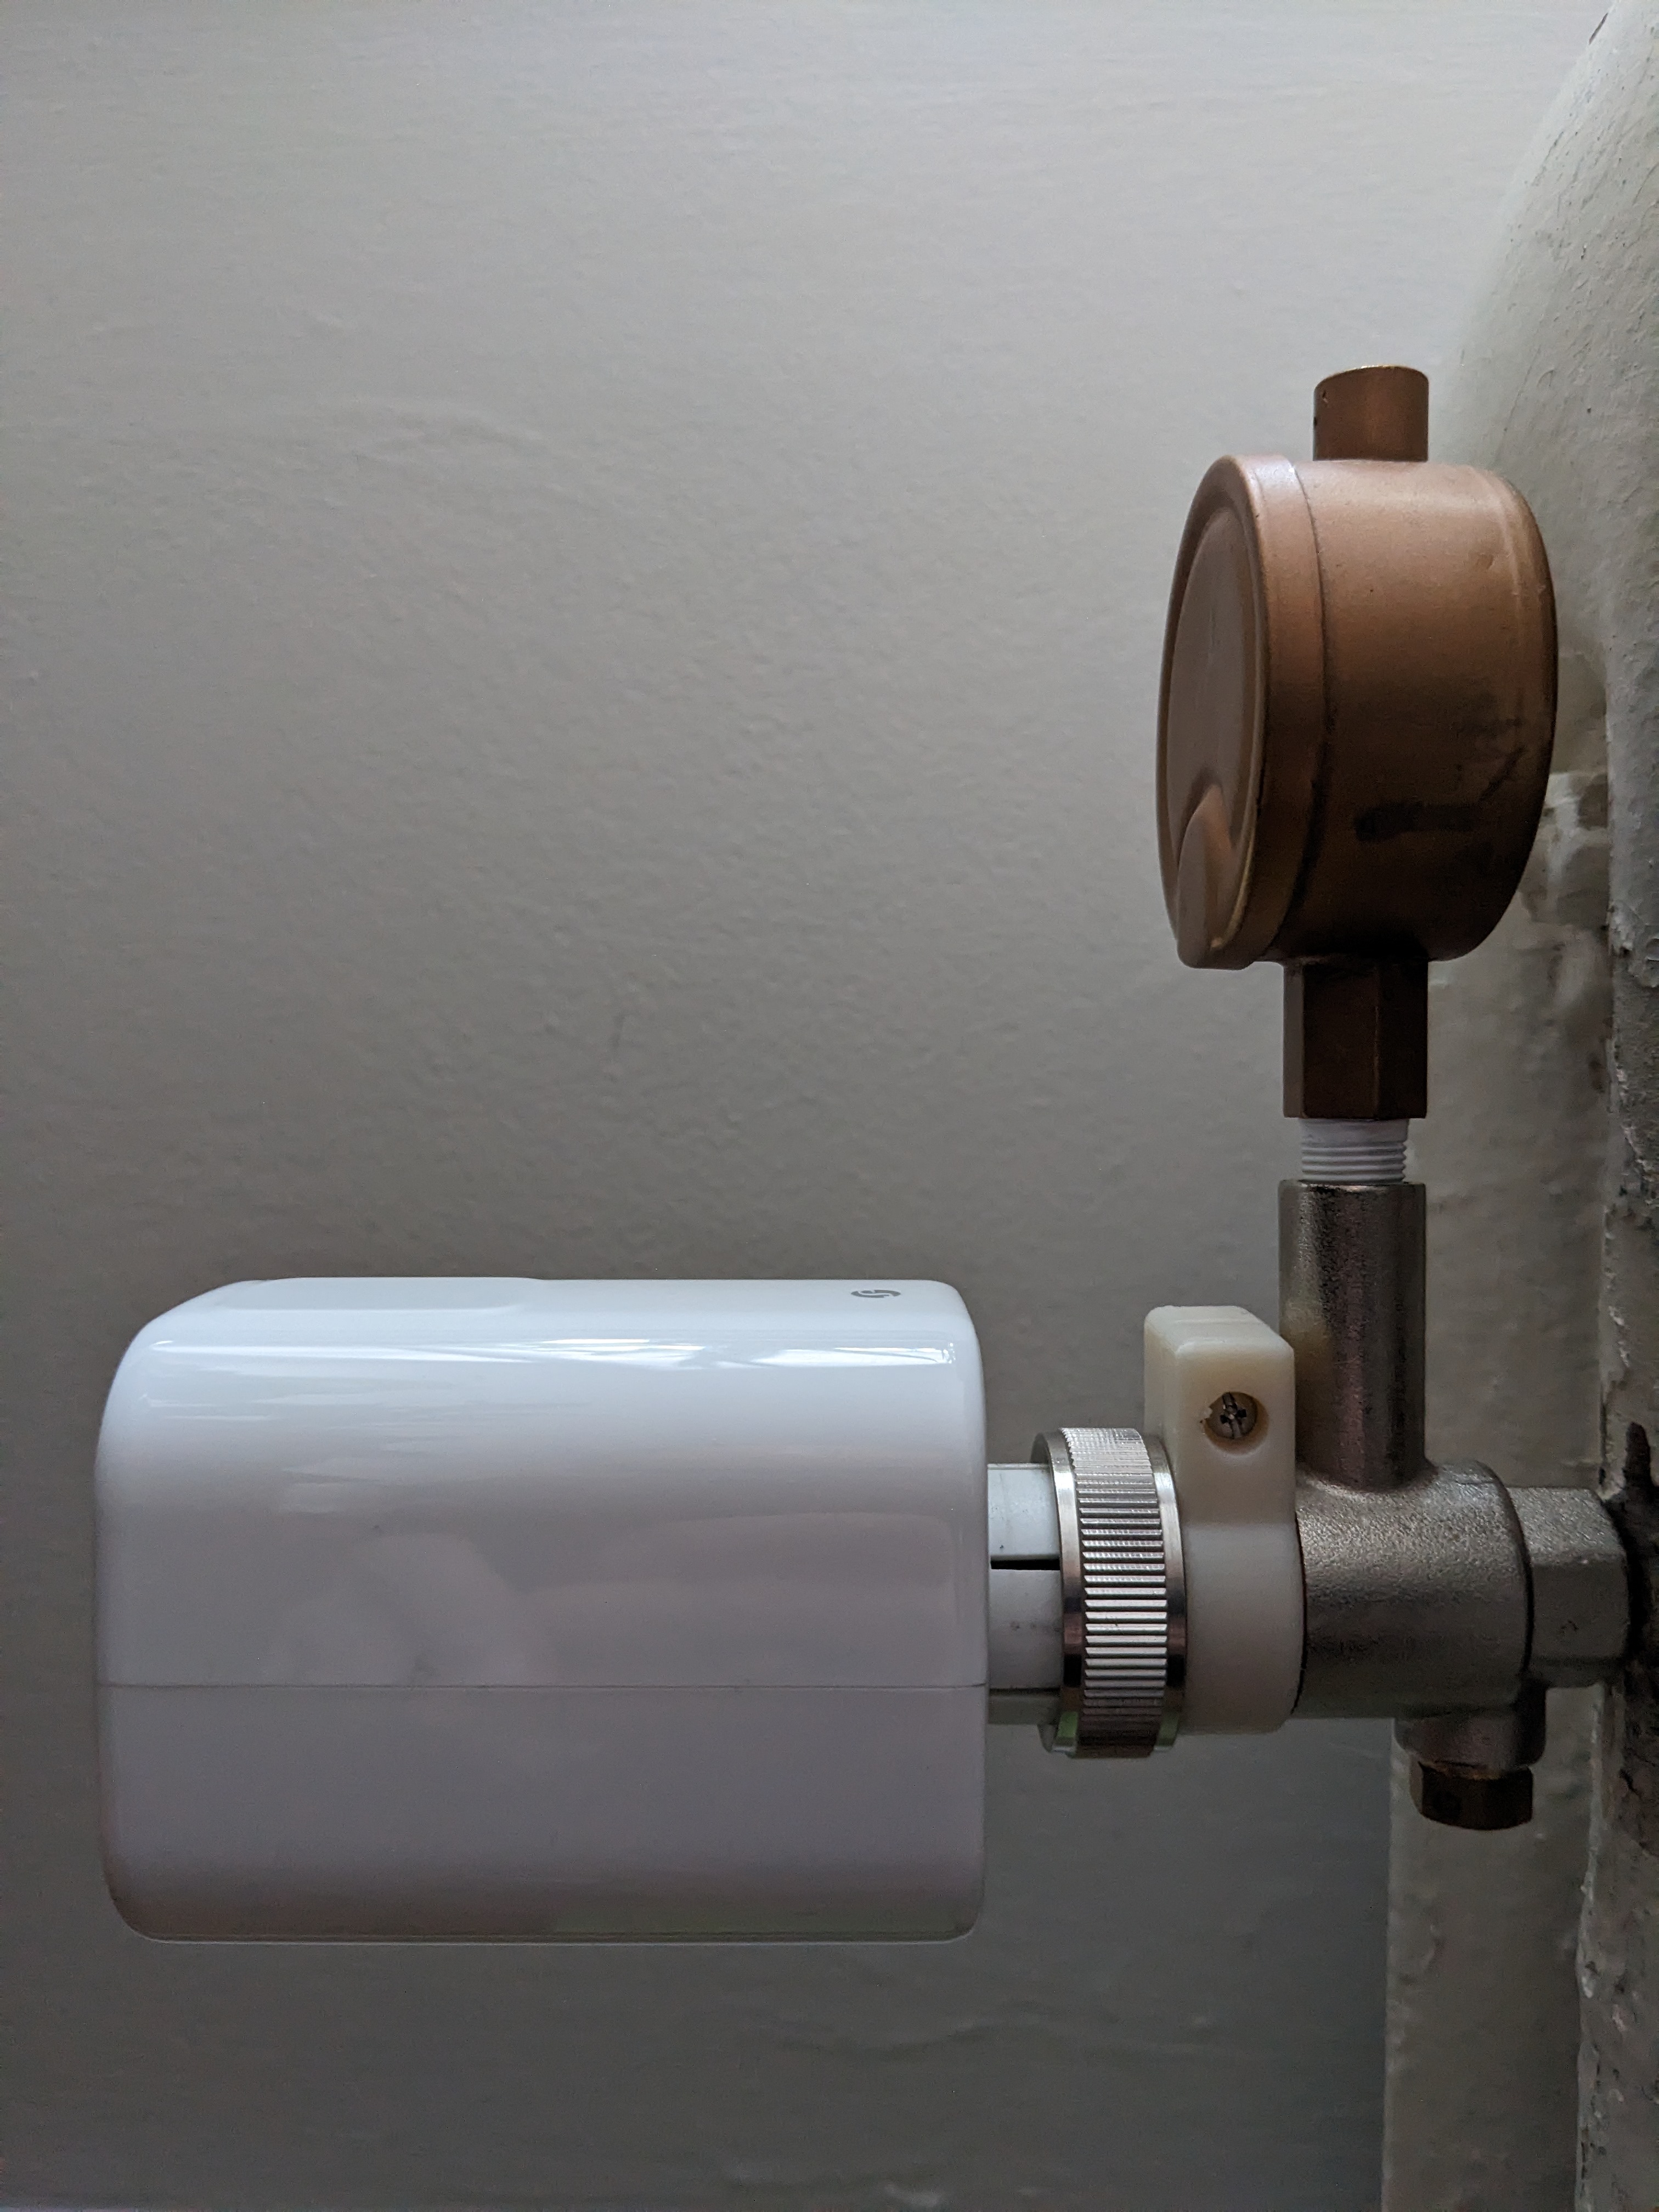
The Shelly TRV attaches to the RA2000 with an adapter. However, I found that the Shelly TRV would not stay securely attached to my RA2000 with the provided adapter. I found an alternative and had it 3D printed by Makelab. Unfortunately that adapter melted, as I had it printed in PLA, which could not withstand the high temperature of the steam running through the valve. My second attempt printing in polycarbonate was much more successful (thanks David!), and the Shelly TRV has remained snugly attached to the RA2000 since making the switch.
The adapter attaches to the RA2000 in place of the Danfoss operator. The alternative operator above can be secured with a #4-40 machine screw and nut. The Shelly TRV then screws on to the adapter. Once everything is attached, the Shelly TRV is started by pressing the reset button. It will boot up and, as with all Shelly devices, create a WiFi network that one must connect to in order to configure the WiFi network. The TRV can be accessed at http://192.168.33.1 for configuration.
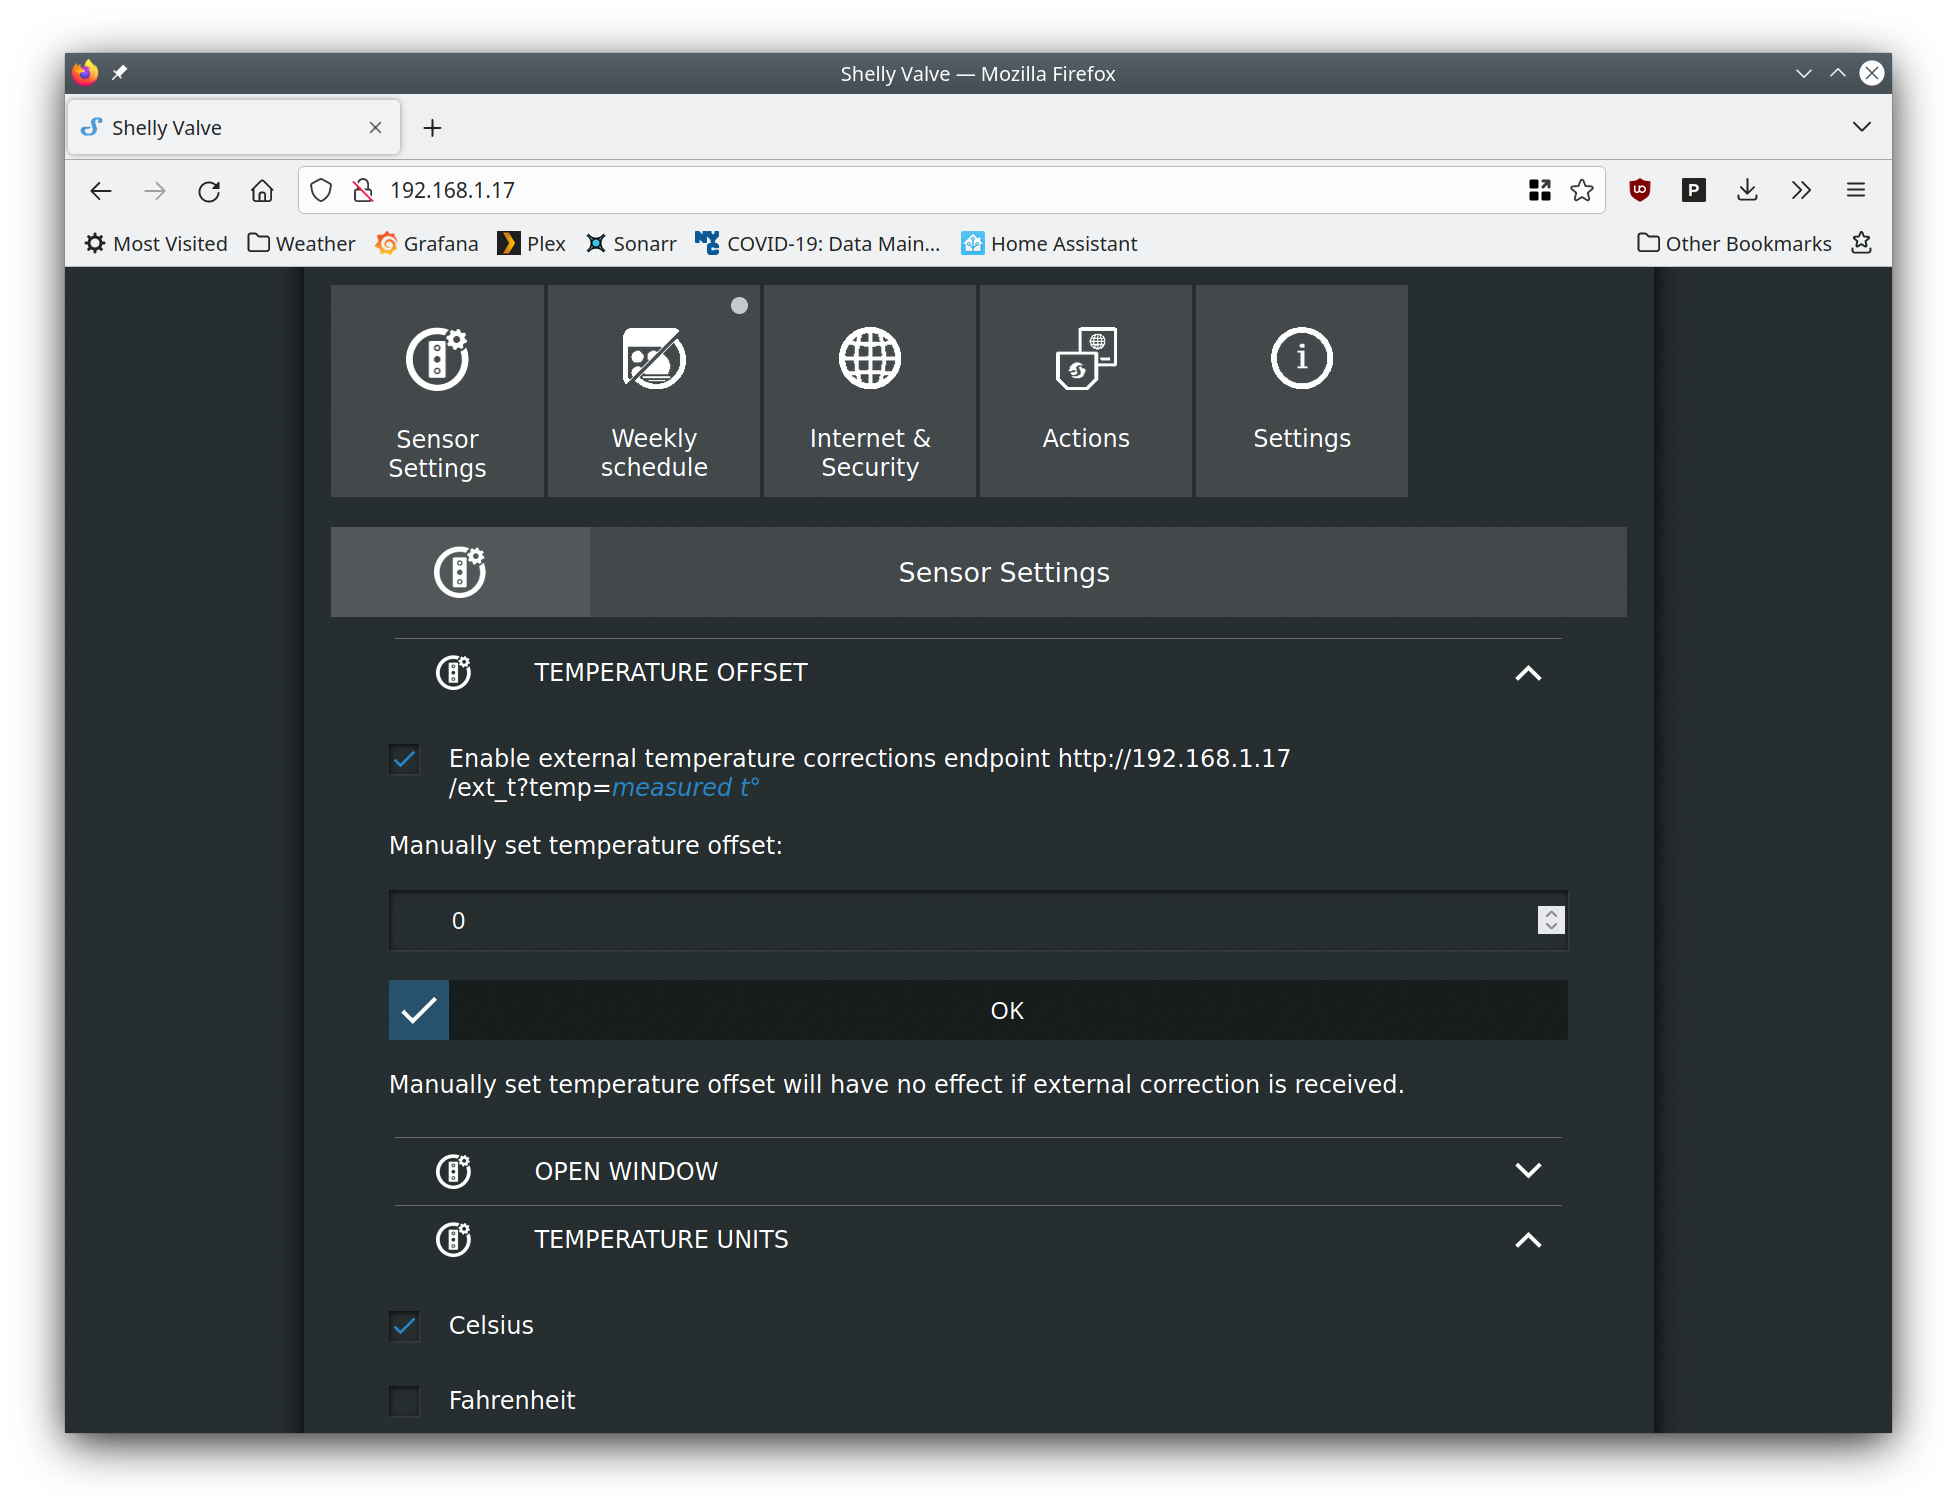
The Shelly TRV has an integral temperature sensor. However, I wanted to provide a remote reading in order to avoid a false reading during long heating cycles (e.g. on cold days, where the Danfoss operator mounted at the radiator would prematurely close the valve before the desired room temperature was reached.) This can be done by going to the Sensor Settings page and selecting “Enable external temperature corrections endpoint”. Ensure that the temperature units below are set to Celsius. This is because the Home Assistant integration presumes the Shelly TRV is set to Celsius, not Fahrenheit.
I left the rest of the settings at their default. However, there may be some desirable changes to be made depending on your situation. By default, the Shelly TRV will use both the externally provided temperature reading as well was the integral sensor. This was desirable for me as if my Home Assistant box goes down or the external temperature sensor is unavailable, I still want my radiator to provide some heat. However, in case this is causing any issues, under the Settings page check the “Enable under floor heating mode” box.
Another potentially useful option is the force close settings on the Settings page. There are two options here — “Enable force close” and “Enable extra pressure”. These may be useful for older thermostatic valves that are not closing properly with the default pressure setting. However, with both these options checked the Shelly TRV may make some extra noise when in operation, so keep that in mind when in use in a bedroom, for example.
With the Shelly TRV configured it’s time to set up the Home Assistant integration. I am using an Awair Element as an external sensor. However, any sensor that provides temperature to Home Assistant can be used. In addition, the Shelly H&T can send external temperature to the Shelly TRV directly. But where’s the fun in that!
First, I created a new template sensor to convert the Awair Element temperature reading to Celsius. By default my temperature reading was in Fahrenheit, but the provided external temperature unit must match the selected temperature unit on the Shelly TRV. I have template sensors defined in a templates.yaml that is included via my configuration.yaml. You can also configure template sensors directly in your configuration.yaml, but it may get unwieldy. Template sensors cannot be configured in the UI and must be manually added to configuration files. The template sensor is configured as follows:
- sensor:
  - name: "Living Room Temperature Celsius"
    unique_id: living_room_temperature_celsius
    icon: mdi:thermometer
    unit_of_measurement: "°C"
    availability: "{{ states('sensor.awair_element_70921_temperature') != 'unavailable' }}"
    state: "{{ ((states('sensor.awair_element_70921_temperature') | float - 32) * 5 / 9) | round(1) }}"
Note that I originally omitted the availability property of the template sensor. This caused some problems — more on that later.
We’ll use a Home Assistant automation to send the temperature to the ext_t endpoint on the Shelly TRV. To do this we add a REST command to configuration.yaml:
rest_command:
  shelly_trv_ext_t:
    url: 'http://192.168.1.17/ext_t?temp={{ temp }}'
Changes to configuration.yaml require restarting Home Assistant. This can be done from the Developer Tools page.
Finally, we create a new automation that will call the above rest_command whenever the value of the living_room_temperature_celsius sensor changes:
- alias: Living Room Temp to Shelly TRV
  description: ''
  trigger:
  - platform: state
    entity_id:
    - sensor.living_room_temperature_celsius
    not_to: unavailable
  action:
  - service: rest_command.shelly_trv_ext_t
    data:
      temp: '{{ trigger.to_state.state }}'
  mode: single
Initially I disregarded availability of the underlying temperature sensor, naively presuming that the temperature reading would always be available. Then I came home one day to find my apartment at nearly 80 degrees Fahrenheit! Had the Shelly TRV failed me? In fact it hadn’t. My Awair Element was offline (it had been unplugged) and was therefore unavailable. The literal string ‘unavailable’ was then sent to the external temperature endpoint — which the Shelly TRV interpreted as an external temperature of 0 degrees Celsius!
Adding availability to the template sensor ensures that the template doesn’t try to convert the unavailable state to Celsius. In addition, the not_to: unavailable property of trigger in the automation prevents the automation itself from sending the string unavailable to the Shelly TRV.
With everything now in place and the Shelly TRV detected by Home Assistant, I added a climate widget to my dashboard. This shows at a glance the current temperature of the room as well as the setpoint of the thermostat. The Shelly TRV has done an incredible job of keeping my living room comfortable, despite an oversized steam system. The sleek integration into Home Assistant is great as well.

The only outstanding issue I have is with the Shelly TRV’s integral temperature sensor. By leaving “under floor heating” disabled, the integral sensor provides input to the Shelly TRV in addition to the external temperature. This ensures that if my Home Assistant integration fails for any reason, or my Awair Element becomes unavailable, that the TRV will not allow the room to overheat. However, I found that the CoIoT integration does not reliably send the integral temperature back to Home Assistant. The integral temperature reading is only sent when there is a change in valve position. I have an open issue with Shelly about this and am waiting to hear if it will be resolved.
Despite the few bumps in the road this is a huge improvement over the standard TRV operator available from Danfoss. While I am happy with the remote sensor in use in my bedroom, my living room is much larger and the temperature varies greatly from one side of the room to the other. The Shelly TRV is a great choice for this situation, and together with Home Assistant it was pretty easy to get set up.